Publishing Website Changes
The Promotion Browse program is used to complete the promotion of sandbox updates to make them active on the live website. As such, this activity should be restricted to those who have authority to change the production site. This is not a highly technical process so those promoting the changes do not have to be programmers or web developers.
Overview of the Promotion Process
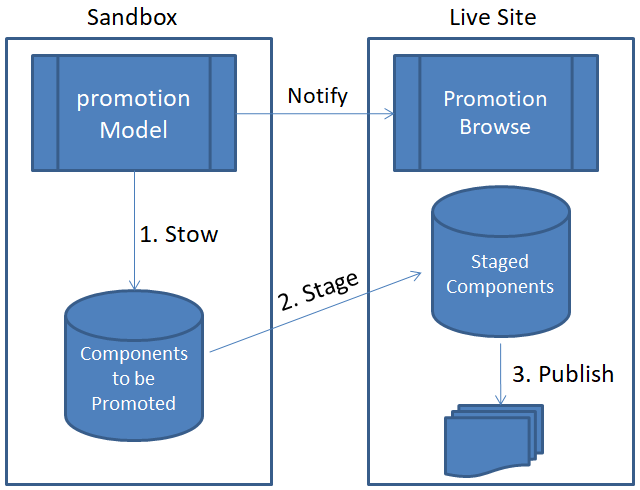
As we can see in the following illustration, the promotion of components from the sandbox environment to the live site is a three step process:
Step 1 - Preparing Builds in the Sandbox
The first step in the promotion process is to assemble the modules to be promoted and to create a "build" using the promotion model. This is done in the sandbox environment by a web developer who is well-versed in the components that make up a "release" to be promoted. Creating the build is the most critical part of the promotion process since often modules have dependencies so it is very important that all related changes get promoted together. If your end-users are involved in completing a promotion they will need to be advised by the web development staff as to which build(s) should be promoted.
When builds are created, the web developer can elect to request backups of the production components before a promotion occurs. If your production site gets significant traffic or performs a critical function you will want to ensure that backups of all important components have been requested.
The stow command is used to generate the build components. This includes up to six files which are used to implement and validate the build. Two of these files are zip files which contain the web components to be implemented on the production server. The stow command also sends a notification to the production server to make it aware of the build.
The remaining promotion steps take place on the live server.
Step 2. Staging Builds
The second step in promoting a build is to "Stage" the build. Staging involves copying the build files from the sandbox environment to the production environment. Note that staging simply copies zip files between the two environments so this will not have any impact on your live production site. Therefore, there is no risk in staging a build other than the fact that the staged build can later be promoted.
Searching for Builds
The Promotion Browse program allows you to browse builds that have been created over the previous few days where the number of days can be set as a parameter called Build Days. This defaults to 7 so if the build you wish to promote a build that was not created within the previous week you will need to increase the number of days in order to include the desired build. In most cases, you will be interested in the latest build which will be the one at the top of the list. If there are a lot of builds to choose from you can filter by build user, version number and promotion id.
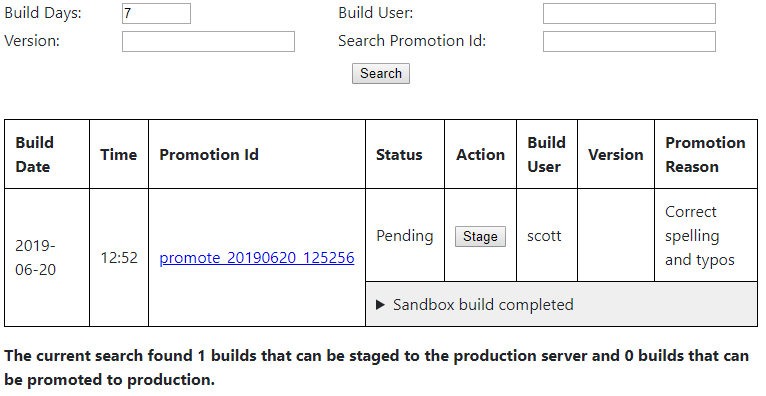
If you are unsure of what components are included in the build you can get a summary by clicking on the arrow to the left of the status message. Here is a sample summary:
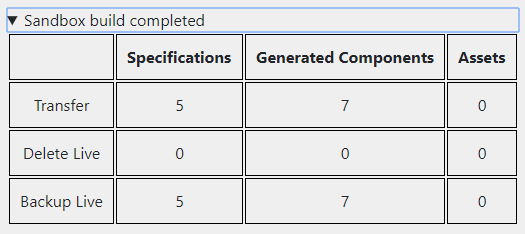
Notice that the summary also shows you the number of components that will be backed up. Note that Assets refer to non-generated components such as images, videos, PDF files, etc.
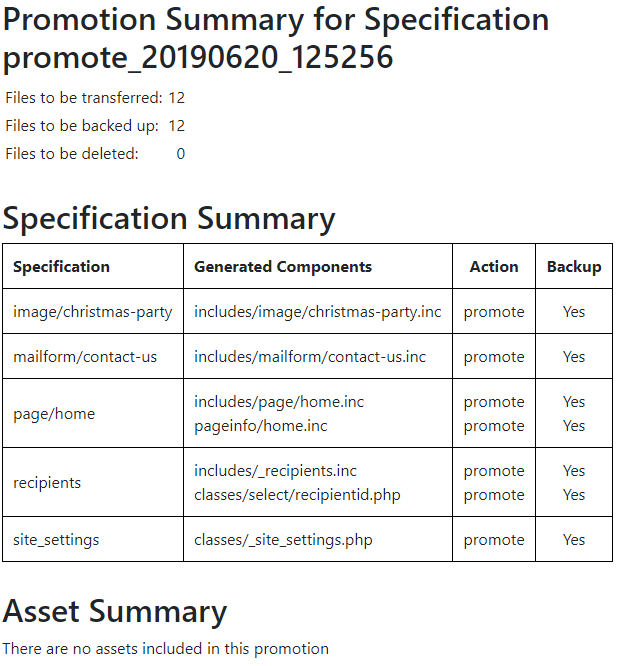
You can get full details regarding which components are being promoted and backed up by clicking on the link under the Promotion Id column. Here is an example of a detailed report:
Once you have identified the build that you want to promote click on the Stage button. This will transfer the generated zip files to the server and present a screen such as the following:
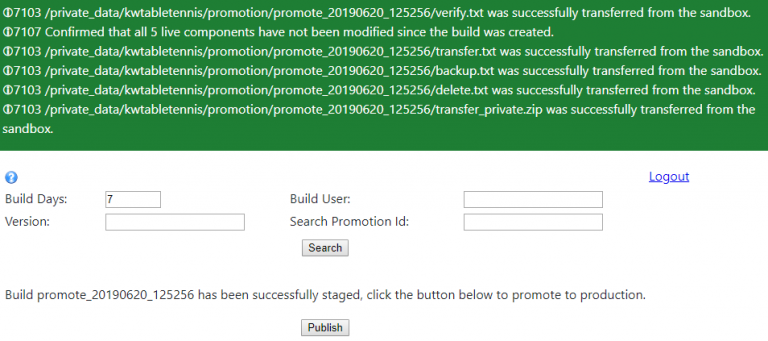
Review the messages to confirm that the staging process completed normally.
Step 3. Publishing Staged Builds
The final step of a promotion is to "unpack" a staged build and copy the components contained in the build onto the live production site. If backups were requested when the build was prepared these backups will be taken as the first step in the promotion process. Notice in the screenshot above that a Publish button is presented immediately after the staging process is completed, if you are ready to publish your changes simply click this button. If you don't want to publish the changes yet, you can come back later and find the staged promotion using the sysadmin/promotion_browse page.
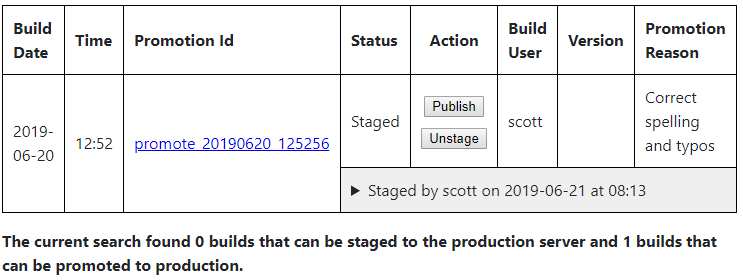
Before promoting your changes you may discover that you want to make some additional changes. In such a case you can click the Unstage button to remove the staged components. In most cases you will click the publish button to complete the promotion to production. After a successful promotion you should see a series of messages such as those shown here:

After promoting a build you should thoroughly test the pages of your production website that may have been impacted by the promotion.
Backing Out a Promotion
If you discover that something is "broken" in the production website after a promotion you may have an opportunity to back out the changes. This option is only available if a backup was requested when the build was created. If a back out is possible (that is, a backup is available), you will see this option for the publish build as shown here:

Note this it is possible to take a partial backup that does not include all promoted components. In such a case, only the backed up components will be restored.
Backed out promotions are not eligible for promoting in the future, you must re-create the build if you want to promote the changes after a build.